“Something” Art Journal Layout

I’m having fun with my handmade art journal and this month’s Stencil Girl Club stencils, so wanted to share the process with you.

SomethingArtJournal_08

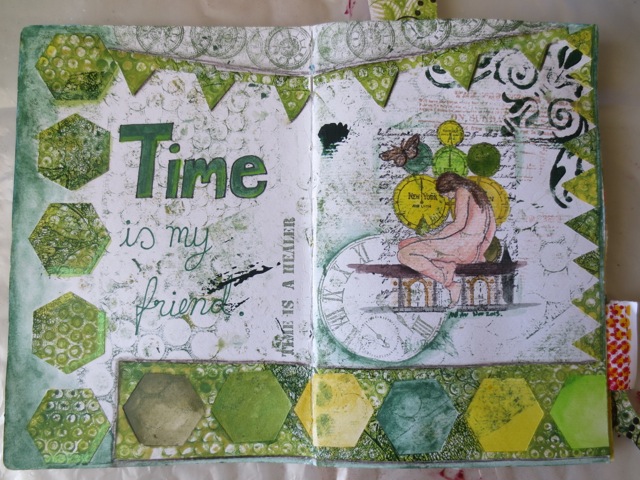
Started with painted greenish squares that had a stencil added. I was “cleaning” off the stencil, so I smooshed the paint around and included the edges. It has a clock face design on it. But I thought it was too bright, so I wanted to add some gesso to tone down but not loose the background, so I added stripes of masking and washi tape, then added the gesso.

Mixed Media Art journal by Michelle Brown

SomethingArtJournal_02

SomethingArtJournal_03

Next I outlined the lines with my favourite black pen [Montana Extra fine Acrylic Marker  filled with  Golden High Flow Acrylic in Carbon Black

SomethingArtJournal_04

The quote was written (twice) in white then went over it again with the black marker.

SomethingArtJournal_05

SomethingArtJournal_06

SomethingArtJournal_07

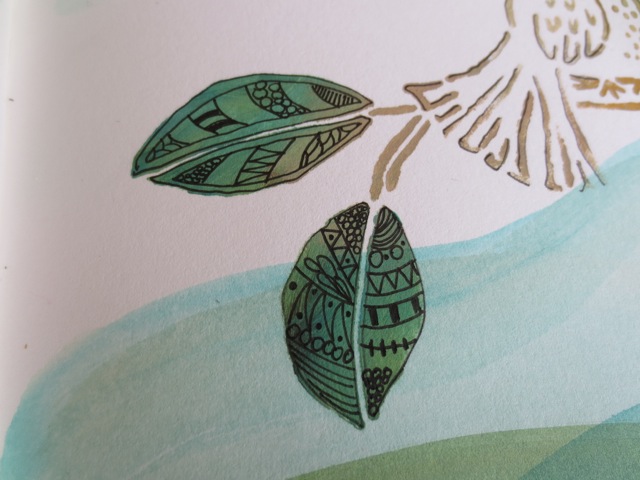
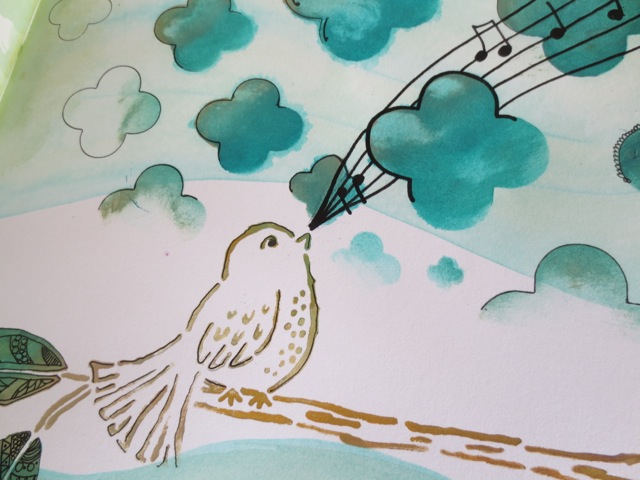
Then it was time to stencil! I used 2 shades of green, a teal and a grey and that helped to make the stencilling really subtle. I used Post-It notes to mask off areas and keep the stripes and quote stencilled.

mixed media art journal with stencil girl stencils

The quote says “If you give up something good to search for something better, you may end up with something worse!”

Thanks for dropping by!

Happy Creating,
Michelle

SomethingArtJournal_11

SomethingArtJournal_09


“Creating Art at the Speed of Life” Lessons 1 to 6

Love doing the lessons in Pam Carrikers book “Creating Art at the Speed of Life”.

Here are my pages so far:

Michelle G Brown Lesson One Pam Carriker  Creating Art at the Speed of Life

Lesson #1 Color Wheeling and Lesson #2 Colorful Language

~ * ~ * ~ * ~ * ~ * ~ * ~ * ~ * ~

Analogous Analogy

Lesson #3 Analogous Analogy

~ * ~ * ~ * ~ * ~ * ~ * ~ * ~ * ~

PamC_Lessons1to63

Pam Carriker  Creating Art at the Speed of Life Lessons #4 and close ups

PamC_Lessons1to64

Lesson #4 One Color at a Time – it had to be blue for this lesson; always a good choice when several mediums need to come together. The elephant – sheep – bird pile image kept haunting me and it HAD to be included into the layout!

~ * ~ * ~ * ~ * ~ * ~ * ~ * ~ * ~

PamC_Lessons1to67

Michelle G Brown

Lesson #5 It’s Complementary ~ here I really liked the background and didn’t want the Critique sheet to cover up the right hand side, so I have taped the side of the sheet, so it can be opened to reveal the full layout.

~ * ~ * ~ * ~ * ~ * ~ * ~ * ~ * ~

PamC_Lessons1to69

Under Wraps mixed media technique

Lesson #6 Under Wraps – love the subtle colours of the water colours here. I had Distress INks that matched perfectly, so used those with the sequence scrap to add interest. I was dubious with the black lines and then shading them, but if came out wonderfully! With real depth, making it look like the black lines are standing out from the background. Very clever technique!

Breaking out the New Art Journal

I have finally spend the money and bought a “real” art journal.

Strathmore mixed media art journal

Actually, that was a few weeks ago, so after painting the faces, I had paint left over and no plans on where to put it – so out comes the new Strathmore mixed media art journal!

(Interesting to note that my fear of starting out in a new art journal was less than my desire to use up the extra paint!)

Stencil Girl and acrylic paints art journal layout

Once the paint was dry, I went over the images with a fine marker any my Golden High Flow Acrylic pen (Thanks Julie!!)

Here are a few close ups:

MichelleGBrown_ArtJournal6  MichelleGBrown_ArtJournal5

MichelleGBrown_ArtJournal4

MichelleGBrown_ArtJournal3


Stencil used are by Stencil Girl – the bird one is from the May Stencil of the Month Club. The Quatrefoil Mix Stencil by Michelle Ward is also be Stencil Girl. *LOVE* these stencils – sturdy, have their name etched onto them AND they clean really well!

The stencils did bleed a little – completely MY fault; impatient and adding too much water. “Steady as she goes” is a MUST for stencilling, especially with paints!!

Happy creating!


Paint shading and faces practice

After watching Dina Wakley painting her tag, I was enthralled with her shading and highlighting with white and dark blue paints. I wanted to give it a try. I’m also developing my face drawings so I put them together to see what I could create.

Michelle G Brown face sketches in her mixed media art journal

I always worry, when painting faces that the colours aren’t true to life – getting “skin” colour “right” is almost impossible. So I took a HUGE step away from trying to get the skin colour “right” and use non-kin colour colours. Here are the results:

mixed media art journal painted faces

Isn’t it disconcerting to see green people?

Michelle_G_Brown_facepainting_closeup

The painting was done with Folk Art paints, straight onto water colour paper. It was a little hard to blend the shading and highlighting colour as the paint was drying quickly. Next time I may add a layer of Gesso first or use my (tiny) collection of Golden paints.

Thanks for stopping by! Happy creating!


More Gelli Printing Fun

Hello Crafty Ones,

Mixed media art Gelli Plate Prints

I have been having lots of fun creating Gelli plate print samples for the upcoming Picture to Page Papercrafts ShowMixed Media Art has taken the plunge into retail and we are having a Pop-up Store at the show, in Melbourne Australia 17 & 18 May 2014. We are focussing on a range of products that have multiple uses, including Gelli Plates and everything you need to get started – brayers, paints, stencils and texture kits! So much FUN all in one place!

Picture to Page papercrafts Show gelli plate prints

We will also have the Wendy Vecchi Stamp It – Stencil It range of flowers – all six! Plus all of Wendy’s new inks and mini blenders to make it easy to throw a tag or card together with a few basic techniques.

Wendy Vecchi Stamp It Stencil It  SISI

Ranger Archival Inks

You may also spy some of the Dina Wakley stamps plus the Gelato sets – so much crafty fun, all in one stop!!

Happy creating,

Michelle

Latest Art Journal pages with Gelli Prints

Having lots of fun adding gelli plate prints and punches onto the art journal backgrounds that were painted during the gelli print process.

“Time is my Friend” Art Journal Layout

Gelli printing

I’m trying to make “friends with Time” as I never seem to have enough of it and Marie Forloe talked about making friends in a recent video ~ How to be Productive. Here’s the first step in that attempt!

Time friends

“Live Life” Art Journal Layout

Using gelli plate prints in art journaling

This layout again used gelli plate printing papers, cut and torn, then details added with charcoal to add highlights. Here is a close up of circles inspired by Roben-Marie and her style, plus a chipboard flower painted in yellow.

Using gelli plate prints in art journaling

To add the “live” text, I used the computer to print out large letters and create a stencil. Then I outlined the letters with a black Sharpie marker then added the colour with Derwent Inktense Blocks. I love this process and continue to have lots of fun with it – you can see other examples here ~ Inspiring Quotes for Art Journal ~ with a few more process steps explained

Using gelli plate prints in art journaling

Marie Forleo quote Art Journal

Using gelli prints for art journal layouts

This quote “Clarity comes through Engagement, not thought” is another Marie Forleo inspired quote. It’s interesting how I can focus on one theme when using quotes that have ignited something inside of me, and use the process to internalise what this quote means to me!

Happy Creating,

Michelle


Some more Art Journal fun!

Luck Art Journal Page

I sneaked into the Pictures to Page craft show last weekend and happen to find some Claudine Hellmuth stamps on sale! When I found both the inny and outy bits, I knew I was destined to have them! The “inny” bits are foam stamps that let you block in the colour. The “outy” bits have the outline and detail. Often these sets don’t line up too well and this was the case here too, so I had to set my perfectionist aside and get on with it!

Art Journal - Luck page

The purple background was already done. It started with a wash of purple acrylic paints. The purple spots were added with a round sponge. The lighter purple circles were made with a medicine bottle lid.  The other spots were made with bubble wrap! It also has some gold in it, so I kept to the colour scheme. Also used my Inktense blocks for the purple striped at the bottom (they don’t have a pink that matches) and gold paint. I also used Brilliance inks – Graphite Black, Lightning Black & Pearlescent Lavender, and Chalk inks (because that is about the only pink I own!). The dress pic didn’t turn out too well, so I went over the black line in charcoal pencil. I used one of teh quote rub ons (actually USED it! Amazing! Donna Downey and her Inspiration Wednesday videos have inspired me to use up my stuff! )I love how the little bits of gold pull together and add sparkle.

The doodling with the gold gel pen is actually my favourite part!

Gold gen pen doodling in art journal by Michelle G Brown


After an hour or so, I had SO much fun and a messy desk! And THAT is the best bit – being creative, having ideas and throwing it all together; not worrying about what anyone may think. I love it when I think of something to dig out to include and I am brave enough to not overthink the process!

Michelle Brown's messy craft desk


Handmade Greeting Cards from Gelli Prints

I’ve recently bought a Gelli Plate and had some fun pulling prints. I haven’t been really happy with the results but on reflection think I may be being too critical. This set was my second session and I had learnt a few things with my first play. I wouldn’t usually use reds, yellows and oranges so i jumped in and tried not to think too much about it. My friend Greta also come over to play Gelli plates – she suggested keeping to warm or cool tones to prevent muddying the design, so I stuck with that!

many gelli plate prints

This one is my favourite – you can see the three layers – first yellow, then orange spots and then red over the circle stencil:

Favourite red gelli plate print

Now I have a heap of coloured sheets and no idea what I am going to do with them!

I needed a birthday card in a hurry, so cut the sheet into four, folded 4 yellow A5 cards in half, stamped a few circles and “Happy Birthday” greeting. then edged in black – all stamping done with Brilliance Graphite Black ink.

using red tones gelli plate prints for handmade greeting cards

You can read more about Gelli Plates at their blog Gelli Arts or you can buy your own here:

Inspiration – sparkly purples

I was hit with another episode of overwhelm after looking at lots of YouTube videos on creating layouts for mixed media art journals yesterday; I SO wanted to make something fantastic – yearned for it! Yet I just couldn’t decide last night where to start. I pulled out boxes and realised that I have HEAPS of stuff, so much of it forgotten about. Stuff here that could be used to create great pieces.

Today, I sat aside all those expectations of trying to create something WONDERFUL and committed to just making something! This is the result.

purple art journal layout


I started with a pre-painted background, with acrylic paints, some stamping and using my handmade stencil of the harlequin patters, I added impasto medium and added sparkles with the Fireworks purple / pink sprays.

Then I added washi tape, paper tags and text blocks, chipboard butterfly (white paint, fireworks sprays and “Fancy Flourishes” stamp by Kaiser Scrapbook, with Jet Black Stazon ink) and chipboard flowers. Plus a little doodling with pens and markers.

June Tip-In page – White

The theme for this months Tip in page is “White” (for the Paper Traders, year long tip in swap / challenge). WHAT a challenging theme!

mixed media collage with heart

I’m not the bravest when it comes to choosing colours but a complete lack of colour was hard. So I went with visual texture, adding paper ephemera and impasto medium (see the square and the negative square – pretty funky, heh!) then I added paints in whites and off whites, added the pink (meant to make it lighter but it was darker than I had planned). Finished off with varnish. Added some stitching and lettering with Rub-ons and paint marker.